Lifecycle Hooks
Lifecycle Hooks
kubelet can run code triggered by Container Lifecycle Hooks. This allows the user to run specific code during
specific events of a containers lifecycle.
For example: running a graceful shutdown script before a container is terminated.
There are two hooks which are exposed:
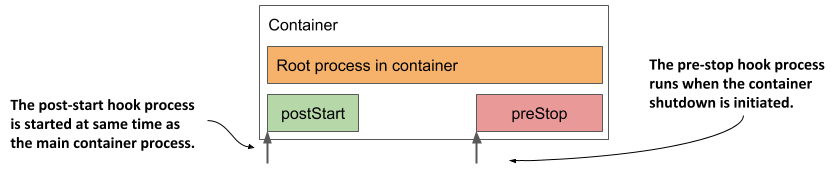
- PostStart : This hook gets executed upon container creation but there is no guarantee that it will run after the
container
ENTRYPOINT. - PreStop : This hook gets executed just before a container is terminated. This is a blocking call which means the hook execution must complete before the call to delete a container can be sent.
Both hooks mentioned above do not take any parameters. There are two types of handlers which can be implemented in the hook implementation:
- Exec : runs a specific command inside the container and the resources consumed by the command are counted against the container.
- HTTP : executes an HTTP request against a specific endpoint on the container.
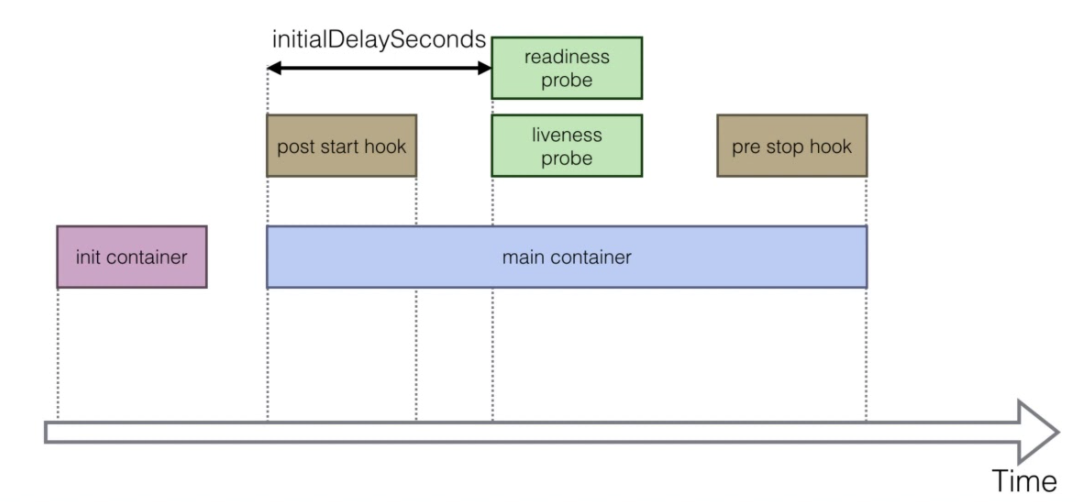
To understand when this hook starts, you will create a pod with a shared volume and you will update the
/lifecycle/timing file, for each hook you will print the seconds counter and a text.
apiVersion: v1
kind: Pod
metadata:
  name: lifecycle-1
  labels:
    app: app1
spec:
  initContainers:
  - name:           init
    image:          r.deso.tech/library/alpine
    command:       ['sh', '-c', 'echo $(date +%s): INIT >> /lifecycle/timing']
    volumeMounts:
    - mountPath:    /lifecycle
      name:         timing
  containers:
  - name:           main
    image:          r.deso.tech/library/alpine
    command:       ['sh', '-c', 'echo $(date +%s): START >> /lifecycle/timing; sleep 10; echo $(date +%s): END >> /lifecycle/timing;']
    volumeMounts:
    - mountPath:    /lifecycle
      name:         timing
    livenessProbe:
      exec:
        command:   ['sh', '-c', 'echo $(date +%s): LIVENESS >> /lifecycle/timing']
    readinessProbe:
      exec:
        command:   ['sh', '-c', 'echo $(date +%s): READINESS >> /lifecycle/timing']
    lifecycle:
      postStart:
        exec:
          command:   ['sh', '-c', 'echo $(date +%s): POST-START >> /lifecycle/timing']
      preStop:
        exec:
          command:  ['sh', '-c', 'echo $(date +%s): PRE-HOOK >> /lifecycle/timing']
  volumes:
  - name:           timing
    hostPath:
      path:         /tmp/desotech
The next command will cat the contents of /lifecycle/timing and you will see the output of the text written by
the hook.
kubectl exec -it lifecycle-1 -- cat /lifecycle/timing
Your output will be similar to this:
1607340288: INIT
1607340290: START
1607340290: POST-START
1607340295: LIVENESS
1607340296: READINESS
1607340300: END
1607340302: START
1607340302: POST-START
1607340305: LIVENESS
1607340306: READINESS
1607340312: END
1607340330: START
1607340330: POST-START
1607340335: LIVENESS
1607340336: READINESS
As you can see you will have 3 cycle, because the pod will be restarted and for each cycle you will see these steps:
- INIT
- START
- POST-START
- LIVENESS
- READINESS
- END
You can add your script using EXEC or HTTP hooks. We will see use of HTTP during Probing exercise.
Liveness
Let’create this pod:
apiVersion: v1
kind: Pod
metadata:
  labels:
    test: liveness
  name: liveness-exec
spec:
  containers:
  - name: liveness
    image: r.deso.tech/library/busybox
    args:
    - /bin/sh
    - -c
    - touch /tmp/healthy; sleep 30; rm -rf /tmp/healthy; sleep 600
    livenessProbe:
      exec:
        command:
        - cat
        - /tmp/healthy
      initialDelaySeconds: 5
      periodSeconds: 5
Apply the file.
kubectl apply -f liveness-exec.yaml
Within 30 seconds, view the Pod events:
kubectl describe pod liveness-exec
The output indicates that no liveness probes have failed yet.
After 35 seconds, view the Pod events again:
kubectl describe pod liveness-exec
At the bottom of the output, there are messages indicating that the liveness probes have failed, and the containers have been killed and recreated
Wait another 30 seconds, and verify that the container has been restarted:
kubectl get pod liveness-exec
NAME            READY     STATUS    RESTARTS   AGE
liveness-exec   1/1       Running   1          1m
Readiness
Readiness and liveness probes can be used in parallel for the same container. Using both can ensure that traffic does not reach a container that is not ready for it, and that containers are restarted when they fail.
Let’s create pod manifest:
apiVersion: v1
kind: Pod
metadata:
  labels:
    test: readiness
  name: readiness-exec
spec:
  containers:
  - name: readiness
    image: r.deso.tech/library/busybox
    args:
    - /bin/sh
    - -c
    - touch /tmp/healthy; sleep 30; rm -rf /tmp/healthy; sleep 600
    readinessProbe:
      exec:
        command:
        - cat
        - /tmp/healthy
      initialDelaySeconds: 5
      periodSeconds: 5
Apply the file:
kubectl apply -f readiness-exec.yaml
Now, take a look about your pod staus:
kubectl get pod
and take a look about events:
kubectl describe pod readiness-exec
Conclusion about Readiness Probe: Sometimes, applications are temporarily unable to serve traffic. For example, an application might need to load large data or configuration files during startup, or depend on external services after startup. In such cases, you don't want to kill the application, but you don't want to send it requests either. Kubernetes provides readiness probes to detect and mitigate these situations. A pod with containers reporting that they are not ready does not receive traffic through Kubernetes Services.
Clean Up
kubectl delete pods lifecycle-1 liveness-exec readiness-exec
pod "lifecycle-1" deleted
pod "liveness-exec" deleted
pod "readiness-exec" deleted